Initially, my pursuit of polarizer skateboarding felt like a leap of faith into a void.
In hindsight, it was a leap into a wormhole that took me back to the early years of skateboarding.
Hardcore polarizer enthusiasts believe this skateboarding era is the sport’s purest form. And the small subculture surrounding these enthusiasts is the holy grounds or most sacred skateboarding area.
What is a polarizer skateboard?
I’d describe polarizer skateboards as 60s-inspired skateboards, made popular by Neil Blender. The basic premise dates to the early 1900s when kids were taking apart roller skates and turning them into skateboards. A polarizer uses modern components with vintage skateboard/roller skate trucks.
This creates a unique culturally influenced mix between form, function, the past, and the present, creating a new breed of skateboarders who search for tight lines on new, unfamiliar terrain.
I date the beginning of this trend back to 2016 when Neil Blender released a skate video titled “When the Grunion Run.”
Granted, this is subject to debate, but this seems to mark the rise of polarizers in popularity worldwide. According to Neil, the true origin of this subgenre, the polarizer is his product, and from my perspective, it would seem like anything that is not made by The Heated Wheel should be deemed “Polarizer Inspired”.
What the polarizer community deems fit to be a “polarizer” is possibly the most difficult question to answer along my journey.
Remember that these “rules” are subjective and may differ among each polarizer enthusiast.
– No risers, – only new wheels, bearings, bushings. – new trucks and wood screw mounting are debated.
“I think it was to be like a ‘rat rod’ but skateboard. Performance-based antique. So the wood screw mounting and roller skate plates were the modern crossover”
“The upside-down deck like what Neil said mimics the 60’s and 70’s down rails of a surfboard that were used on skateboards of that era even though the decks were 6” or less. I think Hewitt and others opted for cut down modern trucks/acs/suregrip trucks and actual mounting hardware as opposed to wood screw mounting.”
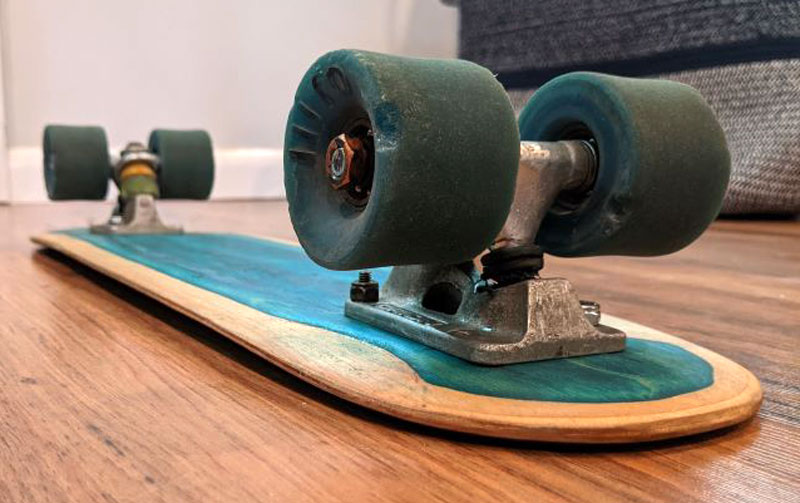
The upside-down deck provides a different feel when carving due to the camber of the deck, allowing the rider to lean more into a carve without picking up wheels on the outward-facing side. It allows the board to flex differently, becoming stiff when going straight and flexing during heavy carves, which creates a tighter turning radius. This unique board feel sets polarizers apart from most skateboards, where the lean into a turn is the primary factor determining how much the board will turn.
“So then ‘polarizer’ became lost in what it’s supposed to emulate, a hybrid performance-based antique.” “It’s skate pedantic really, but it’s got to start from somewhere. That’s why I say I don’t know the exact rules. Just like how ‘rat rods’ have rules, a dated Ethos in a modern world. Where do you draw the line? Polarizers are where Neil drew his line.”
“It’s skateboards that’s what it’s been the whole-time street skating, vert, slalom, downhill, it’s All the same -it’s our Tower of Babel.”
“Neil didn’t invent anything he just found a cool fossil and said “hey remember this?”

What are polarizers used for?
It seems that most riders including myself use polarizers as a trainer of sorts. They seem to be very good for increasing balance, board control, and reaction time as well as allowing for new lines to be found in bowls. These skills can be directly applied to normal skateboards.
Whenever I go to a skatepark, I spend the first 10-20 minutes warming up on a Polarizer-inspired skateboard. Especially if I’m skating in a bowl or a pool. Doing this allows for me to not only decrease the amount of time I spend warming up but also the decreased stability that I grow accustomed to, allowing for me also to decrease my risk of falling by heightening my awareness and increasing my board control.
Another way I use my polarizer, and 60s inspired skateboards is like how most people use cruiser skateboards and longboards in that the goal is getting from point A to B. I have used cruisers and longboards for commuting in the past, but I seem to have more fun on the polarizers.
Where to buy a polarizer?
You can buy polarizers from…
The Heated Wheel is Neil Blender’s brand. Moon Patrol is a guy from Michigan who has mastered the art of making Polarizers.
You may also find a few similar boards from Gordon & Smith and Gold Cup. Due to the growing popularity of these retro-futuristic postmodern skateboards, I expect a few more options, but these would be classified as 60s-inspired cruisers.
Building your polarizer setup
This is not for the faint of heart and requires a fair amount of trial and error.
This method involves looking deep within oneself and finding one’s purpose in life to decide whether there is a will to carry on. It involves climbing through the Himalayas barefoot with Wim Hoff and spending hours meditating with monks on the mountainside until enlightenment is reached.
Or you can just skip those steps and follow my journey.
Polarizer Trucks
What trucks you use will determine everything else about your setup.
- Sure-Grip Trucks
- Heated Wheel Trucks
- Vintage Chicago / ACS Trucks
- Roller Skate Trucks
Let’s start from easiest to hardest.
Sure-Grip Trucks
These are some of the best polarizer trucks. They turn very well and are fairly easy to obtain. There is also a great selection of bushings and pivot cups online.
However, they will pose some difficulties.
Let me explain…
The durability is less than desired. And the baseplates and mounting holes are significantly smaller than modern skateboard trucks.
You could drill out the holes, but the nuts would not fit flush to the baseplate.
Mounting Options
Unless you have a drill press, this leaves you with two options.
One, go to a hardware store and grab some 6-32 bolts with the matching nuts and drill out some new holes. Two, use some wood screws to hold it in place.
The wood screws are easy and quick, but they are not as durable as using the smaller bolts and nuts. When asking Neil about this he said “Both are fine. I prefer wood screws.”
Recommended Dimensions
Dimensions I recommend with the Sure-Grips.
Width: 5in-6.5in (Depends on the wheels).
Wheelbase: 15in-20in
Whenever you set these trucks up, don’t mess with them. Get the bushings and tightness set how you like it and leave it. The treads easily cross-thread and gum up with use. So it’s best to set it up and leave it alone. If you do cross-thread them, don’t worry. I have a solution mentioned in the hybrid truck section.
Axle & Hanger
They have a 4.5in long axle with a 47.625 mm hanger, and this is the ideal truck width for polarizers. You need to keep in mind that with an axle this narrow, it may be difficult to find a wheel that does not scrub on other parts of the truck. This will be covered in the wheels section.
The axle is 5/16 (8mm) in diameter. This may not seem important now, but the diameter of the axle on this truck makes everything a lot easier. Modern skateboards use 8mm axles, and this may not be seen in vintage trucks and roller skate gear.
Vintage Skateboard Trucks
When I say vintage, I am referring to trucks taken from a vintage skateboard, preferably from the 60s or 70s. This is difficult because you need to find a board to begin with.
I recommend looking at antique stores and Facebook marketplace before going to eBay. The prices seem to be better, and who knows, maybe your neighbor was a skate rat in 60s.
If you can find a set of vintage Chicago or ACS trucks those are the most sought-after and coveted trucks in the polarizer community. I found a Roller Derby skateboard and decided to use the trucks to make mine.
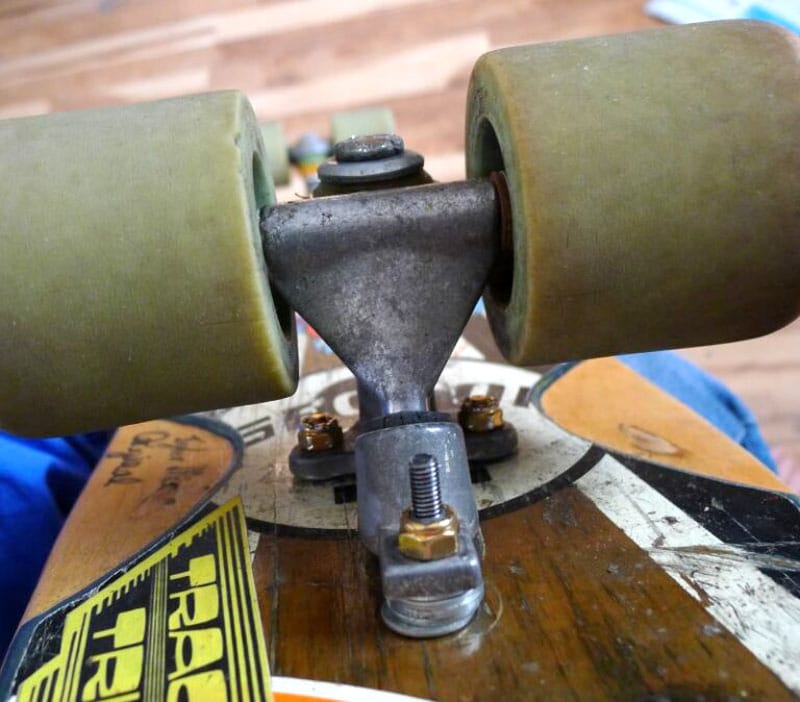
On the same wheelbase, they turn significantly tighter than the sure grips. The taller and more vertical geometry suits longer wheelbases; however, keep in mind that skateboard trucks from this era were primitive and experimental. They also vary greatly in comparison to modern standardized truck systems. So the set of trucks you may find will come with their own difficulties that may be very different from my experience. I will be describing what I needed to do to make the Roller derby trucks work, and what I needed to do may not be the same for other trucks you may use.
Axle & Hanger
The original axles were 7mm and were designed for ball-bearing wheels. They would not accommodate modern hardware. When one finds themselves in this predicament, they could accommodate the smaller axles with 7mm-8mm adapters; however, this will not give much room for washers that may be needed to combat truck bite.
I needed to replace the original axles with a substitute. I ended up using 8mm 24pi rods. I cut the rods down to 5in.
To remove the original axles, I grabbed a hammer, and a long socket. I stuck one side of the truck into the socket and hammered away until the old axle came out. This was not very difficult.
To install the new axles, I drilled out the original hangers with a 5/16-bit, and then stuck the new axles in there with a crap ton of JB-weld. When I say “a crap ton” I mean, put as much as you can on them bad boys and wipe away the excess. After that, I just let it dry.
Neil has a better method. Here is what he said to do.
NB: “Def don’t use a hammer. It’s kind of hard to explain, you need to know which side the splines are on if the axle is already totally loose mild hammering might work, otherwise, stack washers and nuts that are bigger than axle diameter till there are some threads showing on the axle, use axle nut to tighten onto your spacers, the axle will start pulling through, ad more washers as you go till axle gets past splines, do the same to put a new axle in, measure the distance of axel as you go, you don’t want to go past and pull axle back to the center. Sometimes just flipping the axle works well because then you have new aluminum for the splines to grab onto”
TM: “Ok, I got you. What would you use for a new axle? I have used threaded rods with jb weld. It works well, but I’m sure there is a better way.”
NB: “Sure-grip makes replacement axles. JB Weld, that is great love that stuff.”
Making the bushings work was difficult. I used two bushings on the bottom and one on the top so that the truck would not rub on the kingpin.
There are better bushings I could use, but it works. I used old independent bushings on the top and bottom, and old bear bushings in the middle. This bushing configuration is not ideal, but it fits and turns like no other truck I have ever ridden.
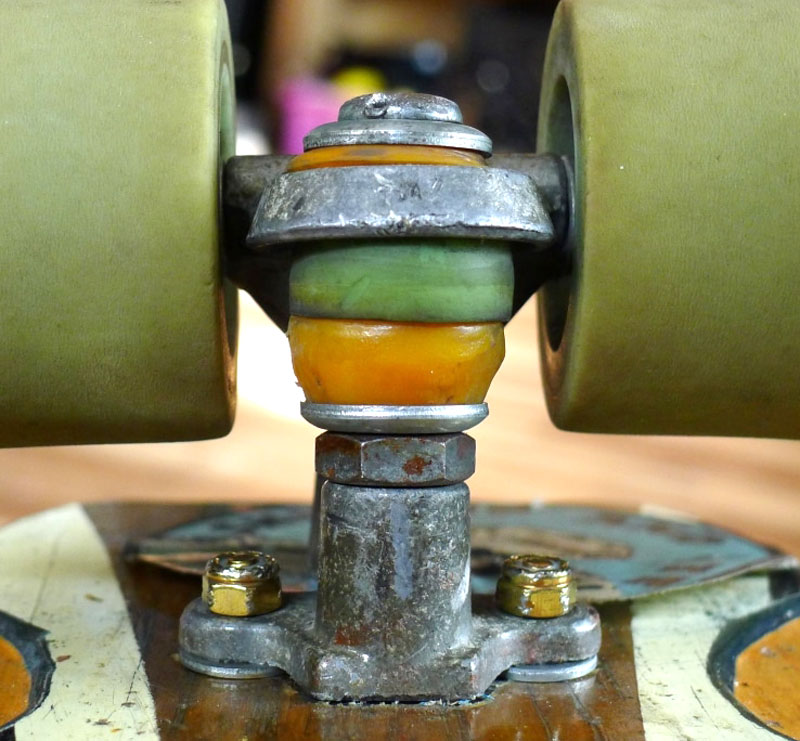
One of the major issues I encountered when using vintage skateboard trucks was the kingpin sticking out too far and scraping the ground. The geometry of the roller derby trucks made it difficult to combat, but since I used a wider axle. I was able to accommodate by using larger wheels and dewedging with kingpin washers on the base to increase my ride height.
Recommended Dimensions
Width: 5.75-6.75 (depends on axles/wheel size)
Wheelbase: 18in-24in
Roller skate trucks
Roller skates are a different animal altogether. I have yet to use a set of roller skate baseplates, but here is what you need to do.
Cut them in half, drill out the holes, and if the axles are too small then follow the steps mentioned in the “Vintage Skateboard Trucks” section regarding an axle swap.
I am not experienced in the use of roller skate trucks for a polarizer, and there is not much information on their use. From what I have gathered from the ones who have, they are all different. Some of them are just like sure grip trucks, and others are nightmares. I would say that this would be one of the harder ways to make a polarizer.
Alternative/Hybrid Trucks
Hybrid Skateboard Truck (Vintage/roller skate hanger with modern skateboard baseplate).
This is a list of the narrowest trucks I could find, and most are too large for a polarizer; however this may beneficial to those who want to make a slightly larger board. For a polarizer skateboard to work as intended, narrow trucks work best. From my understanding, anything over an 85mm hanger would not be considered when picking a truck for a polarizer; however, It is your skateboard. Make what you want!
- Tracker Halftrack: 66mm hanger, 5.35in axle
- Penny trucks: 76.2mm hanger, 6in axle
- Tracker Midtrack: 85.09mm hanger, 6.1in axle
- Polar Bear Trucks: 85mm hanger, 6.5in axle
- Ace 00: 98.425mm hanger, 6.5in axle
- Gold cup skate city 225 trucks

This is how I started, and it’s very difficult to get right. They do not turn as well as the sure-grip trucks, but they are much more durable.
I use a set of hybrid trucks on the board that I skate bowls and try dumb stuff on.
Note that the polarizer community seems to frown on using hybrid trucks, but I think it’s great, and it’s easier using a standard hole pattern. It’s also a phenomenal solution if you manage to break the original baseplates as I did. I also found that there is an advantage to using modern kingpins, as well as the ability to use literally whatever bushings you want to use. The only real drawback that I see with this, is trying to make the pivot cup work.
Bushings
You need to adjust the bushings so that the kingpin is centered in the hanger. To do this, you may need to use extra washers, bushings, or even cut down bushings to get it to be centered. So far, I have not had many issues with the bushings. Normally It just needs to be raised up a bit.
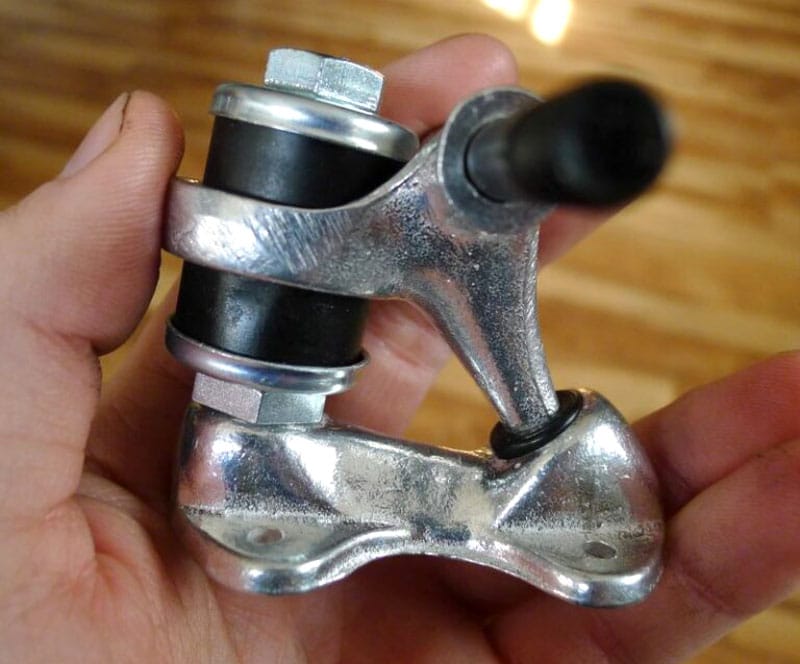
I think that the main issue comes from having a kingpin that is too short. On this baseplate, the stock kingpin was plenty long enough, but for the purpose of this article and sheer curiosity, I hammered out the original kingpin and added an inverted kingpin. This turned out to be a major upgrade. This allows me to run looser trucks without risking the kingpin scraping the ground. I would recommend doing this modification with your hybrid polarizer trucks.
The second issue is the truck angle. Modern skateboard trucks are angled at the kingpin and the pivot cup, whereas roller skate and vintage hangers were designed to be more upright. This may lead to two problems.
The first is that the kingpin may scrub on uneven terrain, and the second is quite odd. Whenever the hanger is raised so that it sits center on the kingpin, the hangers are then pushed at a dramatically forward angle. This increases the turning radius dramatically. Normally this wouldn’t be a problem. That is why this is weird. The turning radius is so tight that it becomes quite difficult to ride, and it takes away from the appeal of the polarizer.
With a turning radius being this tight, the rider is unable to lean and carve. The solution that I have come up with is to de-wedge the tuck so that the kingpin sits at the desired angle.
I used washers and can tabs to get the kingpins vertical and using washers instead of rubber risers allowed me to further experiment with the truck angle by slightly increasing or decreasing how much the truck is de-wedged.
Pivot cups
It may be difficult to make the tongue of the Vintage/Roller skate hangers fit within the pivot cups of the modern baseplate. I would recommend using sure grip pivot cups, and modifying those to fit inside the modern baseplates. If they do not fit snugly, you have a few options.
1) Sand the Vintage/roller skate Pivot cup to fit inside of the pivot cup in the modern baseplate you plan on using. (This is where I found the best results)
2) Find rubber grommets at a hardware store that fit. (this is mostly trial and error. They work great but do not last as long. If you go this route, Try using shoe goo to make it work.)
3) Wrap the pivot cup with gaff or electrical tape. (Seems Sketch, but it works surprisingly well)
Polarizer Wheels
Wheelbite caution
Wheels are subjective to what trucks you are using. Due to the decrease in hanger size, an offset wheel would seem beneficial. This is because the hangers are so small that the inside of the wheel may scrub parts of the trucks or bushings, creating a phenomenon known as truck bite; however, this wheelbite is vicious.
To combat this, a rider may use washers to increase the distance between the wheel and the hanger. One may also put the lock nuts on backward to allow for more washers to be installed. Although putting the locknut on the trucks backward is an odd way of doing this, it is very effective and does not have any adverse effects. The locknuts seem to work the same backward and forwards.
Wheel Size
The wheel should be around 50- 58mm but is most commonly 54-55mm. There are many reasons that this size of wheel is preferred.
A wheel this size is historically accurate as to the size of wheels people rode in the 50s and 60s. I think the primary reason for using a wheel this size is because it provides a good balance between rolling distance, rolling resistance, and most importantly the maximum amount of momentum generated in a pump. It is large enough to overcome most terrain with minimal effort, but it’s not too large to hinder the speed generated in a pump. This is all subjective, and if you want to use 83mm wheels on your polarizer, please do so and tag us on IG.
Durometer
Hardness is simple. When a rider is making tight carves and does not want to lose traction, a soft wheel is required. The range of wheel hardness that I see most often is 78a-85a.
A great correlation of this is rock crawling. Go on YouTube and watch a Rock Crawling compilation. You will find many different vehicles doing a wide variation of maneuvers to get to their desired destination. The one thing that all of them will have in common is the use of soft grippy tires. If one was to swap the tires on their rock climbing vehicle to street slicks and run the recommended tire pressure, they will find the lack of traction preventing them from getting far.
Core placement
Center set wheels would be better for turning radius. The decrease in surface area would allow the truck to pivot about its axis with less resistance, but you need to make sure that the lip of the wheel does not scrub on the truck.
Lip Profile
A solid edge is most common because it’s hard to find a wheel with a lip that does not scrub the truck on the inside; however, an off-center sharp edge wheel allows the rider to have a bit more lean in the carves.
The wheels I would recommend the most are the ones that I see the most. The heated wheel and Moon Patrol use 56mm Bones Rough Riders. This is a fast, soft grippy wheel that fits most trucks and will not disappoint.
On the Gordan and Smith 60s-inspired skateboard, they use 55mm Powell cruiser wheels.
Another wheel is the Oj super juice 55mm. These will require a few washers, but I like the feel. These wheels are fun to carve with and last a long time.
The last thing I recommend is to think outside of the box and try something different. If you have an old set of longboard or cruiser wheels not listed above. Try them and see what happens. I put an old set of Hawgs fatties on the board with roller derby trucks, and they are awesome!
Bushings
With bushings and pivot cups you have 100s if not 1000s of combinations to choose from. You can go the roller skate route and use the Sure-Grip “Super Cushions,” or go the more traditional skateboarding route and use independent bushings or any street bushing for the matter. Mixing and matching different durometers and sizes will allow you to attain a personalized and unique riding experience to suit your needs.
Here is what Neil said about bushing:
NB: “Here’s some bushings that are good. Bones soft: remember to use all bottom ones 14mm, otherwise you bottom the kingpin out.”
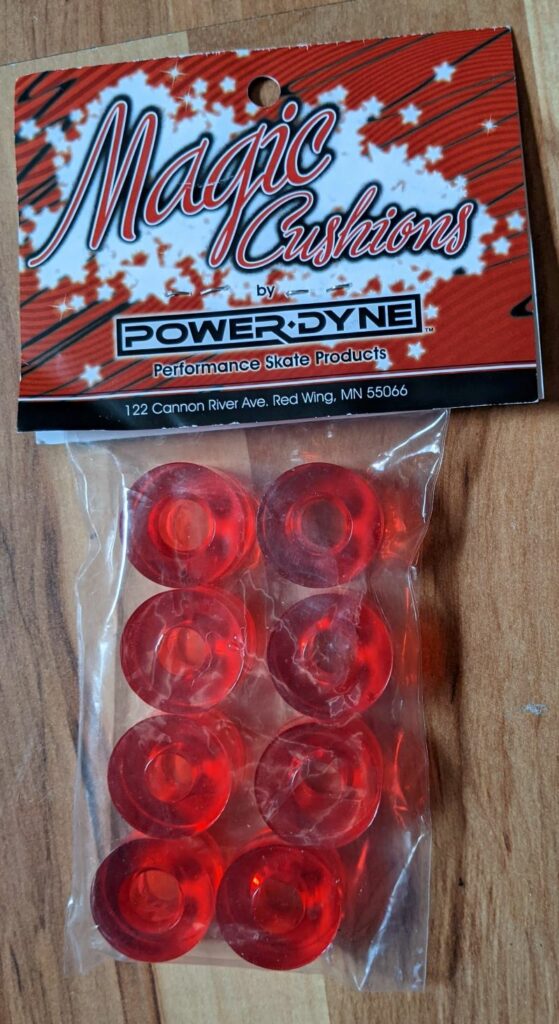
“If you need more resistance. Power Dyne Magic cushions “Universal” the yellows work for most people.”
“Bont bushings 78a are good too which are also for roller skates, cone on top barrel on bottom.”
I was curious to try the Power Dyne Magic cushions that Neil recommended, and they are the best bushing setup I have tried so far. Remember that this is subjective to my weight, height, and riding style, but I will most likely continue using these bushings.
Polarizer Deck
When selecting a deck to use when making your board, remember how you want the board to flex.
The flex of the deck plays a major role in how the board rides, and if you are using a street board, you need to flip it upside down so the deck is stiff and has a high rebound.
The upside-down deck is surprisingly comfortable and will not take long to get used to.
If you want a concave or flat deck, you need to find a longboard deck that is flat or has extra plys to prevent the board from breaking. Flex is only necessary when trying to mimic the Polarizer, but stiff decks are also fun.
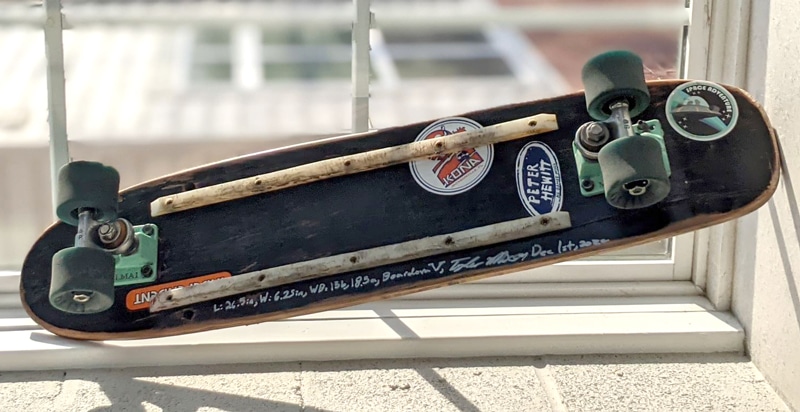
The one pictured was made from a bent piece of wood at a hardware store that I cut out and shaped to perfection. I threw some rails on there for extra strength, and it has been awesome!
Deck shapes are normally significantly wider than the wheel width. I would recommend the width of the deck you cut out to be between 6-6.75in depending on your preference.
Polarizer shapes are influenced by Longboard surfboard shapes through different eras, but it’s your board. Break the rules and make your shape and design your own width and wheelbase.
If there is one thing, I have learned from going down this rabbit hole, make whatever you want, and have fun doing it.
Neil Blender’s Words
“These types of boards allow someone who basically gives up on skating due to age or thrashed body to continue skating and feel that movement that got them going in the first place, it’s also a good beginner board, kick tails are overrated.”
“Simply put, a Polarizer is the name of the model from The Heated Wheel. I’ve been fascinated by convex” just a little though” ever since I got a board from a thrift in Ohio that had this, it’s an oak board, early 70’s.”
“Once I realized you can get this feeling by turning a modern board upside down, I’ve been stoked. When Steve Claar saw it he said “you should call that a polarizer because people are either going to like it or hate it” @claarsteve There’s also a Peter Hewitt model on Heated Wheel, it’s smaller and flat based off early 70’s shapes @goonsac Polarizer is based off early 60’s surfboards, a Hap Jacobs “pig” model to be specific. @jacobssurfboards” “both boards are 6” wide and use roller skate trucks”
“60’s and 70’s had the same thing going, just not the updated urethane, clay wheels were harsh,the early decks were harsh, stiff, G&S made Fibreflex boards in the mid 60’s, truly ahead of their time, urethane wasn’t even around, too many hippers led me back to this type of skating, the original way of skateboarding.”
“I encourage people to cut up old boards and experiment, find roller skates, you see a pair of skates at a thrift store, and that’s pretty much it for them, they’ll probably never get ridden again by anyone maybe some kid that wants to roller skate, but that’s pretty rare so it’s cool to bring those trucks back to life and use what was already in our past “ -Neil Blender
Resources
- Neil’s Instagram
- The Heated Wheel
- Moon Patrol
- Assembly Skateboards
- Fuck With Your Trucks
- Pretty Rad
- Tiny Truck Thread
- #PolarizerSkateboard
